Loot To Forge ore farming route by stage: where to stand, which ores to reserve, which to sell, and the four-hit rule that tells you to move down a stage.
Loot To Forge Ore Farming Route: Stage By Stage, What To Skip
The route is one sentence long, and four independent source families phrase it the same way: farm the deepest stage you can clear cleanly, not the deepest one you survive. In practice that means sitting on stage 7 for most of the early and mid game, because it drops six ores at once while the stage behind it drops two and the stage ahead of it is a 500M HP boss. Everything else on this page is the detail that turns that sentence into a schedule: where to stand, which of the six to reserve, which to sell on the way past, and the four-hit rule that tells you to move down before you start losing ore to attrition.
- Stage 7 is the farm target. Six ores at once, and the least disputed fact in the game.
- Reserve four. Gold, Obsidian, Sapphire and Fire Crystal all appear in recipes.
- Sell stages 2 to 4 outright. Six commons, and they fund every upgrade you have.
- Four-hit is the ceiling. Five hits means you are earning less per slot than the stage behind you.
- Mobs respawn every 28 to 30 seconds. That interval is what makes idling on a stage viable at all.
- Death drops every ore you have not banked. Banked means back at the hub, not the next room.
Official source: +1 Loot To Forge on Roblox, place 118805555015549 by Good Bro Studio, universe 10684750879. The universe record, read 2026-10-04, publishes no stage table, no drop rate and no spawn timer. Every drop list below is community-observed and graded by how many independent lineages carry it.
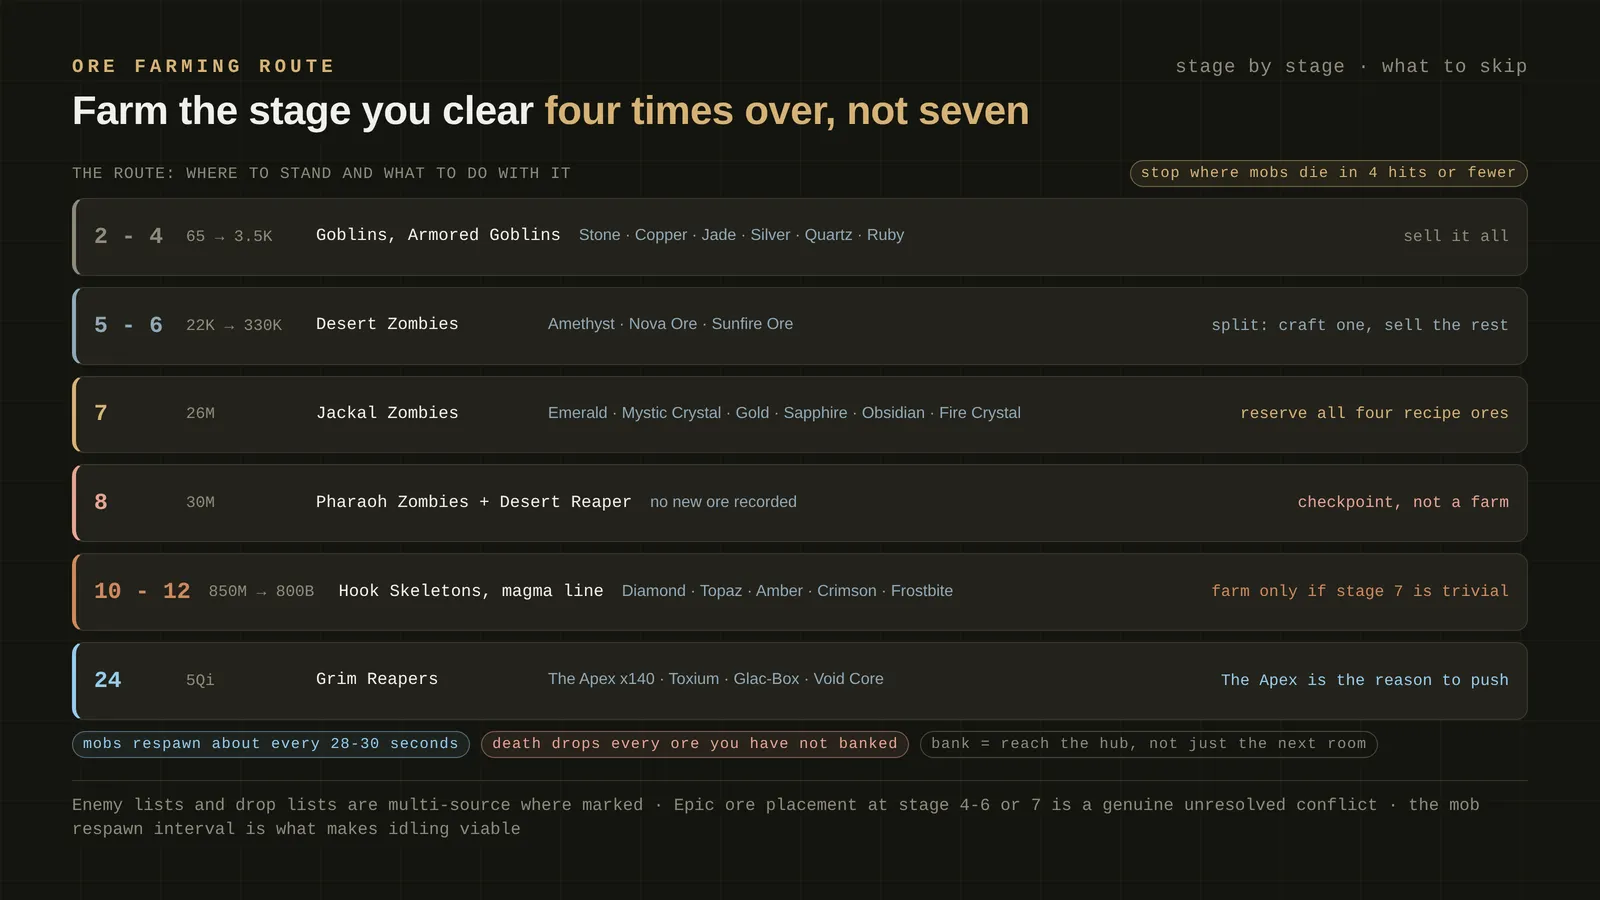
The route, stage by stage
Six stops, each with a different action. The action column is the part that is missing from a drop table.
| Stage | Banner power | Enemies | Ores reported | What to do |
|---|---|---|---|---|
| 2 to 4 | 65 to 3.5K | Goblins, Armored Goblins | Stone, Copper, Jade, Silver, Quartz, Ruby | Sell all of it |
| 5 to 6 | 22K to 330K | Desert Zombies | Amethyst, Nova Ore, Sunfire Ore, Fire Crystal | Split: forge one, sell the rest |
| 7 | 26M | Jackal Zombies | Emerald, Mystic Crystal, Gold, Sapphire, Obsidian, Fire Crystal | Reserve four, sell two |
| 8 | 30M | Pharaoh Zombies plus Desert Reaper | No new ore recorded | Checkpoint, not a farm |
| 10 to 12 | 850M to 800B | Hook Skeletons, magma line | Diamond, Topaz, Amber, Crimson, Frostbite | Only once stage 7 is trivial |
| 24 | 5Qi | Grim Reapers | The Apex at x140, Toxium, Glac-Box, Void Core | The reason to push at all |
Stage 7 is where the route parks, and the reason is not its power, it is its yield per kill. Six named ores drop there, and five source families across four independent lineages publish the same six-name list. Nothing else in the early game comes close. The 26M banner is also a 78.8x jump from stage 6, so stage 7 is where players spend an disproportionate share of their time.
Stage 8 is where people stall, and the framing that unsticks it is in every source that covers it: fill your stage 7 bag, forge and enhance it, max your training multiplier, bank a rebirth or two, then come back. The Desert Reaper holds roughly 500,000,000 HP. Four lineages index that room as stage 8 and one as stage 7, and the HP and the banner are not in dispute, only the number. Bosses never heal back to full between attempts, so a failed run is progress rather than a reset. Full detail on that fight is on the Desert Reaper guide.
What to keep and what to sell
The sell window is where beginners lose the most, because the wrong ore looks worthless and is not.
| Ore group | Action | Why |
|---|---|---|
| Stone, Copper, Jade, Silver, Quartz, Ruby | Sell | They fund upgrades and carry no crafting value |
| Amethyst, Nova Ore, Sunfire Ore | Split | Recipe ore that also sells well, so keep one stack |
| Gold, Obsidian, Sapphire, Fire Crystal | Reserve | All four appear in recipes and all four drop on stage 7 |
| Prism, Toxic, Panic-Core, The Apex | Reserve | The highest multipliers and the lowest drop rates |
Those four reserved ores are not a hunch. Gold plus Obsidian plus Sapphire plus Fire Crystal is the one material combination cross-sourced anywhere in this game, reported as the Epic Phantom Violet Katana. Even that is a lead rather than a guarantee, since the game has no recipe book, but it is enough that selling a full stack of any one of them is the most expensive early waste available to you.
The recorded sell ladder runs from 200 Coins for Gold (ore) up to 320.54K for Magmacore, and only 20 of the 48 known ores have any recorded value at all. Two values move with your rebirth coin multiplier, so the same Void Core has read 91.52K for one player and 93K for another. The full ladder and what it means is on the ore sell values guide.
Selling a full stack of Gold, Obsidian, Sapphire or Fire Crystal. All four appear in recipes, all four are reported on stage 7, and those four together are the one cross-sourced combination in the game. Check the forge preview before every trip to the stall, and if the preview shows a class you want, the ore is worth more in the slot than in the window.
The four-hit rule, and when to move down
This is the single most-repeated piece of route advice in the game, and three independent source families state it in the same words. It is a community benchmark, not a formula.
| Hits to kill | What it means | What to do |
|---|---|---|
| 1 to 2 | Instant kill | Keep farming, you are wasting bag capacity |
| 3 | Efficiency starts dropping | A warning, not a wall |
| 4 | The ceiling community accepts | This is where you stay |
| 5 or more | You earn less per slot than the stage behind you | Retreat one stage |
The mechanism behind the rule is the respawn timer. Normal mobs respawn about every 28 to 30 seconds, confirmed by two independent families, which is why standing in one spot on one stage is a valid farming loop rather than an idle animation. What the timer does not do is refill your bag faster than you can carry it out. A slower kill means fewer cycles per minute, and the ore sitting on the floor during the wait is the same ore you would have collected on the stage below.
The retreat is also a mechanic, not a preference. Bosses never chase you out of their room, the corridors between stages are neutral grey that terrain monsters and bosses cannot cross, and you can step back exactly one stage and top off on weak mobs while the boss keeps the damage you already dealt. Two stages back does nothing. Every boss guide in this game is built on that loop.
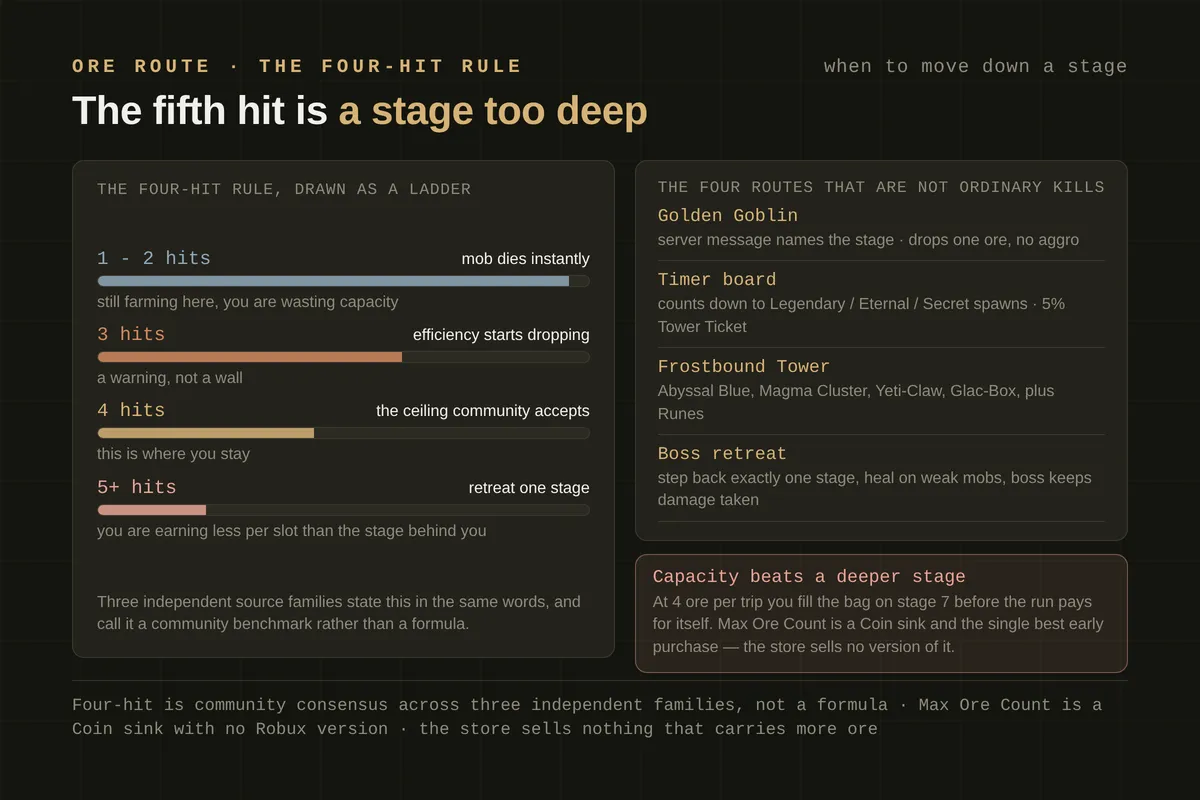
The four routes that are not ordinary kills
Ordinary stage mobs are most of your income and none of your interesting income. Four other routes exist.
| Route | What it does | How to catch it |
|---|---|---|
| Golden Goblin | Drops one ore, possibly Legendary tier, Toxic or Solar Flare | A server message announces the stage number |
| Timer board | Counts down to Legendary, Eternal and Secret spawns | Above the dungeon gate. Also a stated 5% Tower Ticket |
| Frostbound Tower | Abyssal Blue, Magma Cluster, Yeti-Claw, Glac-Box, plus Runes | Costs 1 Tower Ticket, unlocks at your second rebirth |
| Boss retreat | Keeps dealt damage while you heal on the previous stage's mobs | Available on every boss fight |
The Golden Goblin does not attack you, which is what makes it worth routing for. It has been recorded in stages 2, 11 and 14, and one of those records came with the actual server message, Golden Goblin has spawned in stage 14. Whether it drops anything above Epic is one community reading plus a single report of a Solar Flare, so treat the tier as a possibility rather than a plan.
The timer board timings disagree between sources. One run read 01:30, 16:30 and 31:30, spaced fifteen minutes apart, and another showed 10, 4 and 30 minutes. Nobody has reconciled that, so watch the board rather than planning around a schedule.
The Frostbound Tower is the exception that rewards reaching stage 7 slowly. It is a side instance beside the main stages rather than a linear stage, it runs 30 floors in six groups of five, and higher groups stay locked until you have earned them. It needs a Tower Ticket per entry, and each rebirth hands you two.
At 4 ore per trip you fill the bag on stage 7 before the run pays for itself. Max Ore Count runs from 4 to 24 across twelve steps, with the first three costing 200, 1,000 and 5,000 Coins, and the store sells no Robux version of it. A deeper stage with a bigger bag beats a deeper stage without one, because the ore you cannot carry is worth exactly zero.
Bank discipline, and the stage list that keeps moving
Three rules protect a run, and all three are about losing ore rather than failing to gain it.
Bank means the hub. Ore you carry is ore you can lose. Death drops everything you have not brought back, confirmed by two independent families, and the game sells a 3 Robux Recover Lost Ores item because losing a full bag hurts.
Spend before you reset. Power is the only stat the rebirth warning names, and three sources still tell you to empty the forge before a big reset rather than sit on an unspent stack. Read your own panel, since the community is not unanimous about whether a stored stack carries.
Do not trust a stage number for two weeks. The dungeon was at 22 stages on 2026-09-23, at least 26 by 2026-09-25, and showed a Dracula end stage by 2026-09-28. Several stages have no recorded power banner at all, and the trackers leave them blank rather than guess. Any route older than a couple of weeks describes a slightly different dungeon, and the stage power chart carries the same caveat on every number it publishes.
No drop rate exists anywhere in this game. Not one of the 48 known ores has a published percentage, and every source that publishes a drop list publishes a list only. That is why this page ranks stops by yield per kill and by evidence grade, and never by expected drops per minute, which would be a number nobody can compute.
FAQ
What is the best stage to farm ores in Loot To Forge? Stage 7. Five source families across four independent lineages publish the same six-ore list there, and every one of them calls it the early and mid farm target rather than a finish line. Behind it sits a 500M HP boss and a 26M to 30M banner, so the route parks at 7 and treats 8 as a checkpoint to return to.
How do I know when to move to a harder stage? The four-hit rule. If ordinary mobs die in four hits or fewer you are clearing cleanly and the stage is worth staying on. At three hits efficiency starts dropping, and at five you are earning less per ore slot than the stage behind you, so move down rather than pushing through.
Which ores should I never sell? Gold, Obsidian, Sapphire and Fire Crystal. All four appear in recipes, all four drop on stage 7, and those four together are the one material combination cross-sourced anywhere in this game, reported as the Epic Phantom Violet Katana. Prism, Toxic, Panic-Core and The Apex are the other four worth reserving, for a different reason: nobody can farm them fast.
What happens if I die in a dungeon run? You drop every ore you are carrying that you have not banked at the hub. The game sells a 3 Robux Recover Lost Ores item, which exists precisely because that penalty stings. This is also why Max Ore Count, which raises how much you can carry, is the best early purchase.
Can I farm ores without clearing dungeon stages? Yes, four ways. Kill the Golden Goblin when the server message fires, watch the timer board above the gate for Legendary, Eternal and Secret spawns, run Frostbound Tower floors once you have unlocked them at your second rebirth, and use the boss retreat loop to farm a boss room's worth of damage while topping off on the previous stage.
Are these stage numbers still right? They are right as of 2026-10-04 and they move. The dungeon went from 22 stages to at least 26 in three days, ten stages have no recorded power banner, and the trackers leave those blank instead of guessing. Treat the enemy lists as the stable part and every stage index as a community reading that drifts.
Related Guides
- Loot To Forge Ores — the full 48-ore table with multipliers, drop stages and evidence grades.
- Loot To Forge ore sell values — the 20 recorded sell prices, and how rebirth moves them.
- Loot To Forge Stage Power Chart — the twelve recorded banners, the 78.8x and 88.9x walls, and the stages with no reading.
- Loot To Forge Frostbound Tower — the 30-floor side instance that drops ores the main stages do not.
- Loot To Forge Beginner Guide — the first-hour sequence that gets you to stage 7 in the first place.
More Loot To Forge Guides
Loot To Forge bosses list: Desert Reaper 500M, Pirate King, Grim Reapers, Count Dracula at 9 Sx HP, plus the four fight rules that keep you alive.
Two of three Loot To Forge codes are disputed by sources 48 hours apart. Every code is dated, graded by source tier, and marked Working or Disputed.
Desert Reaper: 500,000,000 HP behind a 26M Power banner, fighting Pharaoh Zombies. Sources split on Stage 7 vs Stage 8 - here is the evidence.
Ember Stone in Loot To Forge: the Frostbound Tower drops about 200 a minute, stage 6 idling gives 2,400 a night, and what one stone costs in Robux.
Full enhance cost model for Loot To Forge: 8.55 attempts and 434 Ember Stones for +0 to +6, and 38.92 attempts for +5 to +8 once level loss starts.
Loot To Forge enhance runs +0 to +6 at 5 to 100 Ember Stones a step. The success table, why failure drops a level at +6, and what a Protection Scroll saves.
Frostbound Tower unlocks on rebirth 2, costs 1 Tower Ticket per 30-round run, and drops runes plus Ember Stones. Packs run 49-4999 Robux.
All 6 Loot To Forge gamepasses with official Robux prices from 29 to 999, and the catch: every developer description is blank.